|
|
That's right, from taking apart your Benelli to doing your own custom chop-jobs, it's all here!
Of all the pages from my old site, this was certainly the last one I ever expected to retrieve and upload again-- none of the text was saved, and I sure as hell wasn't planning on actually setting aside time to re-write everything-- or at least until Ryan, a Benelli chop-job customer of mine, dropped me an e-mail telling me that my site had been copied and posted over at Airsoft Focus! So, it's up & running again, minus a few things... enjoy!
|
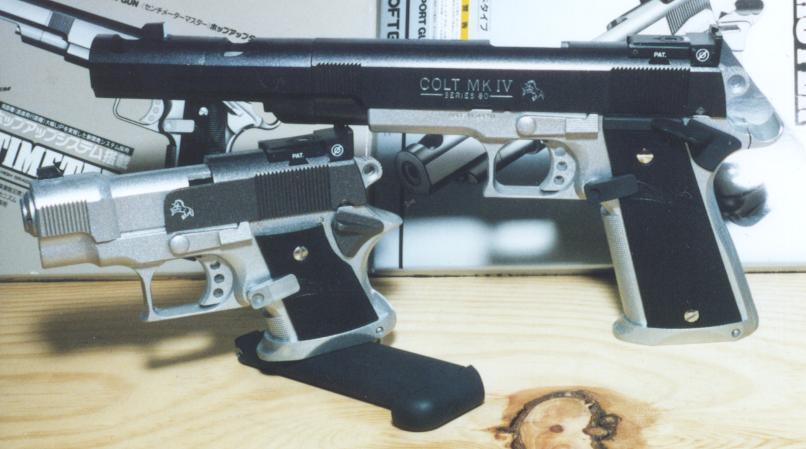 Do it yourself modding? What to buy...
One of the great things about airsoft is being able to get an accurate replica of your favorite battle rifle, exact is nearly every detail and form... until, of course, everyone you know buys the same gun. Now you`re not so special. So what do you do? Well, you could shell out big bucks for a custom job from those robber-barons in Hong Kong, and put all your faith in them in the hopes that they didn`t take any short cuts. Want to save your money and also know exactly what`s in your gun? Do the job yourself. You`ll be proud, if you do it right. The big mistake that many people make, however, is that they use the wrong materials... you know, model glue, putty, cheap paint. I`m not going to tell you exactly how to do the hard stuff; if I did, I wouldn`t be able to make money. But I will tell you what works great for customizing... let`s get it on!
Custom jobs involve a lot of cutting and filling. You`ll need tools. A small, "hobby hacksaw" is great, and the blades are easy to change. They look like coping saws; in fact, I think that`s what they`re normally called... but the variety of blade types allow you to shred plastic or fine-cut metal. They are also very agile; you can mark & cut angles in plastic with relative ease. When cutting barrels & slides, this will be your best friend. Also along the lines of cutting is the straight-edged razor. Buy a pack of those replacement blades that they use for glass scrapers. They`re about two or three inches long, and are sharpened only on one side. They can be used for a number of things, from shaving excess plastic off the seams to smoothing out putty on the guns` surface. Sometimes people want the "Made in Japan" or "ASGK" markings removed from their piece. I just squeeze a spot of glazing putty on the blade, and smooth it over the lettering. Works like a charm. Raised lettering (like the KWC logo on their 1911`s) can be shaved off with ease. If you want to fill small gaps, screw holes, or seam lines, just use the blade & putty, smooth over and paint. With practice, you can remove nearly all the seam lines from a gun. I`ve done this to many springers, it`s easy and the results are amazing; I`ve had people mistake some of my springers for GBB`s! Another great item is a mill file. A small one (under six inches) will do, I use them for smoothing & straightening cuts in plastic & metal. The reason why my chopped Benelli M3`s have such an even cut is because I finish the job with my mill file. It takes time, but it`s a lot more precise than depending on my blade to do all the work. If you need to round off the edge of a cut, move the blade back and forth in a curved path. Rounding off your edges will give the piece a smoother, more finished look. Files come in a variety of different shapes, though, so the possibilities are (almost) endless. Round or curved edged files are great for smoothing out filled seams on curved parts of your gun. The Holy Grail of all cutting tools is the Dremel. This baby will make your life a helluva lot easier if you gotta gut-out a stock grip. Be warned that the high speed can cause the plastic to heat up and warp. Wear gloves, goggles, and a shirt... I`ve had liquified plastic hit me, and it burns like a b!tch. Don`t be stupid if you have a Dremel; wear protective stuff, and forget about trying to collect a cash settlement from me if you get hurt: I have real guns too...
After you`re done chopping your new gun to pieces, you`ll need to cover up the scars. You`ll also need to glue the pieces back together. First thing first: if you`re using model glue, STOP IT! Model glue bonds by "melting" the plastic; when it dries, the two pieces are mixed & bonded. Good for your 1:32 scale Tiger tank, bad for your TM Ruger. Let`s say you`ve just chopped your UHC Desert Eagle in half and removed an inch to shorten it... how are you going to rejoin it? Super glue. It`s that simple. You have to use just enough to coat the surface. Too much causes it to gum up and not properly bond the plastic. The surface being bonded has to clean. This will make for a good bond, just so long as you have enough surface area. For those of you constantly unscrewing things and opening your gun all the time, a small amount on a toothpick can be swapped inside of stripped holes. It`ll give it something for the screw to bite into again. Super glue is also good for filling small cracks. It works well because it can get into tight spots and seal the two parts with a good bond. After filling seams with glazing putty, I`ll seal it with some crazy glue to not only strengthen the bond, but seal out liquids as well. It takes time and patience, but it`s better in the long run. By now you`re probably wondering what the hell this glazing putty is that I keep mentioning... well, wait. I`ll get to it. Another adhesive I use dries flexible, it`s 100% silicon. Use this stuff around barrels, motors, mechaboxes, anything that is subject to constant vibration. It also helps absorb sound, especially around metal parts and internals. The bad thing, however, is that you can`t really paint it. So watch where you`re spreading that stuff. Where to buy? Anywhere, it can be used for sealing fish tanks, car parts, almost anything. If you can`t find it, you`re probably blind and shouldn`t be shooting shit anyways... For tough jobs that require a solid hold, I use PC-7 Super Epoxy. You have to go to construction supply shops for this one, but it can be drilled, sanded, painted, filed, etc. It takes ten hours to dry, and working with it is a pain in the ass. Imagine peanut butter. It`s that bad. Still, I got it to hold a metal plate to the rear of an AK`s plastic receiver, and that plate is holding up a metal tube-framed stock. Strong stuff. If you want a form-fit for your vertical grip directly to the outer barrel or front stock, then this stuff is for you. If you can't get PC-7, you can probably get away with using Bondo. Now this stuff is found in almost every auto repair shop in the great U.S. of A. It comes in cans, and you have to mix it with this cream hardener. It dries pink, but it can (and should) be painted. Like PC-7, you need to have some patience... messy as hell, and it burns if it stays on your skin for too long. On the lighter side, it dries in half an hour. It`s also heavy, so filled parts will give the gun more weight. You can even throw in some weights while it`s still soft to add even more heft. Great stuff, I love it. If I cut a hole too big, I just fill it with Bondo and re-drill the sucker. If I have a handguard that doesn`t want to fit, I`ll pour some Bondo into the open area. You can use wax paper to protect the parts you don`t want to get stuck, and some WD-40 on your razor will keep the Bondo from sticking when you smooth it out. If you have dropped your gun a lot, the sights are probably banged up; fill the gouges with some Bondo. When it dries, you can sand it down back to the original shape. To strengthen it, put a few thin coats of super glue and allow it to soak in. This will harden it even further. Now Bondo puts out a glazing putty... it comes in a tube, and dries on its own without having to mix anything. Squeeze some on a razor and run it along the seams, filling it as you go. If you want to cover up any screws, just fill up the hole until it`s even with the rest of the plastic. If you ever need to open the gun up again, you`ll have to dig that glazing putty out again, so think twice before doing this. Any unwanted marks ("Made in Japan", "ASGK", etc.) can be covered just like how you would to the seams, and it can be painted without priming. Just make sure not to layer it too thick, or it`ll take a while to dry. Usually it only needs five minutes. Now that you`ve fixed your gun, you need to paint it...
Now you`re ready to paint. For metallic colors, like what you`d find on UHC & TM`s KP-85 Ruger, Dupli-Color makes auto touch-up paint in small spray cans. They coat thick, but the lettering still shows through. It lasts quite a long time, and the variety of colors available will match any "factory color". I painted my USP slide metallic charcoal, and the finish has held up pretty well against wear. For black, Bondo has their own spray primer. It dries flat, very nice for stocks and grips. On handguns, it makes the plastic look like pakerized metal. For those wishing to paint in the "S-E-F" on their UHC MP5-SD3, use a fine brush to paint in the lettering. While it`s still a little wet, wipe off the excess with a tissue damp with thinner. To prevent any thinner from ruining the lettering, wrap a block or lighter in the tissue so it`ll keep a straight edge on it. That way you`ll wipe off the paint on the flat surface without touching the inlay lettering. For sights, use the Dremel and a round cutting bit to make a dot on the front & rear sights, and fill them with any color that suits you best.
By the time you`ve finished reading all this, you have either lost all interest in airsoft, or you`ve actually learned something. In any case, that ends it for now. E-mail me at evilcuttlefish@yahoo.com for more help. |
 Make a Benelli M3 Entry/Taking apart your Benelli/Fixing your Benelli!
I`ve seen DEN`s version of this gun, and the job was a bit sloppy... the cut wasn`t clean & even, they had to drill a hole through the magazine tube to screw the front sight in the barrel, etc. Well, before they even came out with theirs, I had chopped mine... the day I got it! All you`ll need is a hacksaw, masking tape, a mill file, epoxy or crazy glue, a drill, and some black paint. First, figure out how short you want the gun to be. Now use the hacksaw and cut the barrel & magazine tube about one inch from there. Yank the magazine tube spring out. Put the tape around the barrel & magazine tube nice and tight so it forms a perfect band for you to use as a cutting guide. Make sure that the magazine tube cut is just a little shorter than the barrel cut. Use the hacksaw for the final cut, and finish up with the mill file for a nice, straight edge. Drill a small hole in the barrel, directly centered for the front sight. Now you can use needle-nose pliers to screw the sight in through the barrel, or you can simply epoxy it in place. For the magazine tube cap, shave the two retaining "bumps" on the sides and coat the inside of the magazine tube with epoxy. That way when you slip the cap back in, epoxy won`t ooze out the sides. On top of that, you won`t have those two ugly holes on the sides. Wad some tissue & stick it in the barrel & paint the bare metal left behind from the cut. The tissue will keep paint from getting into the inner barrels. After it dries, pull out the wad & laugh at the guys who bought their M3 from DEN.
Benelli take-down:
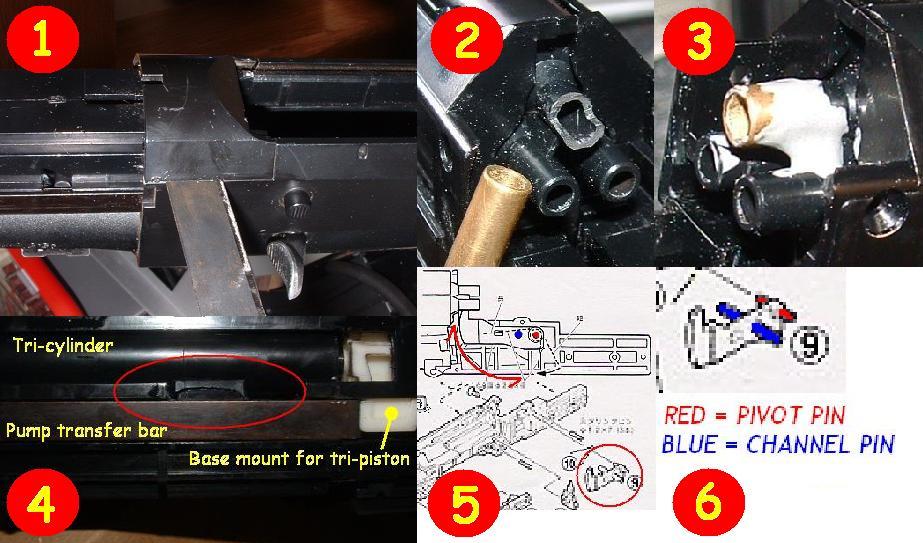
Take off the rubber butt-pad. It conceals a screw; take that out and slide the stock off. Now move to the pump. There are two screws under it, take them out. Use a razor (the refills for the glass scrapers are great!) to split the two halves from the bottom; it`s best to start from the end closest to you. Once you`ve widened it enough, fit a flathead screwdriver and wedge the right halve away from the gun. The left side is held in by a screw, so remember not to pry that end. Now that that`s off, take out the two screws that hold the pump transfer bar in place. The transfer bar is a thin metal bar that transfers the force from the pump action to the receiver. Do this for boh sides. Now take out the screw that holds the plastic U-shaped shield in place. This part is normally exposed when the gun is assembled (but not the screws), it is the plastic part with grooves on it that you see behind the cocking pump. Once that screw is out, slide it forward. No need to take it off. It should now expose a metal bracket with two screws in it. Take those out on both sides, and the front end should now slide out from the rest of the receiver. Now for the receiver itself... you`ll need that razor again. Locate a curved squarish piece of plastic with a rectangular hole in it that is located forward of the shell door. Find the L-shaped seam where the piece is glued to the receiver. Not going too deep now, tap the razor with a screwdriver into the seams to break the piece free (see above, pic #1). Once off, set it aside. Spread the end of the receiver shell where it goes around the three inner barrels, and slide it to the rear and off of the receiver. Two things will now happen: the transefer bars will fall free and the cocking limiter will pop off. The cocking limiter is a spring-loaded silver lever that engages the white plastic tri-piston housing after the gun is cocked. If you were to take it out, the gun could be cocked multiple times, allowing you to fire salvos of 6 or 9. To access the barrels, take out the screw that holds the inner barrel housing in place. You`ll need to cock the gun partially to remove it; replace one of the transfer bars by putting the notch on it in place and pivoting it back into its slot. It may not sit flush in palce, you might have to manipulate the BB limiter. Look for a curved slot with a shaft in it; you`ll have to move that shaft down in order for the transfer bar to fit in place. Now that it is, push it to cycle the gun part way. Once the inner barrel housing has been frred from the tri-nozzle, lift it out. That`s it! That`s all there is to it. I don`t suggest going any further than this as you can easily repair most of the damaged parts from here. I also don`t suggest trying to upgrade the spring; as you can see, there`s actually two in there, and the power required to propel both pistons is much stronger than anything a standard stock AEG spring can put out. Now that this is up, everyone can stop bugging me about how to open their Benelli ^_^.
ADDENDUM: Benelli diagnosis & repair!
The Benelli has a tendacy to jam, and nobody really knows why or how to repair it... I think it stems from either a bad BB getting off track when loading or a BB being allowed to get off track because the pump wasn`t cycled fast enough. This is what happens: you cock the gun like normal, but for some reason, the pumping handle doesn`t return to the full-forward position. You`re thinking it`s just a misfeed, and it is. What you don`t know is that the BB for the top barrel has misfed, and is now resting between the tri-nozzle unit (the tri-nozzle is part of the cylinder unit; it looks pretty much like three springer cylinders melted into one piece). When you fire the gun (and most everyone does because they are not aware of what happened), the tri-cylinder slams forward about 1/4 inch because the piston heads are pushing the improperly seated tri-cylinder unit, and the result is that the BB jammed in the tri-nozzle area causes the top nozzle to crack. For reasons unknown, this also causes the hop-up to tear in any one of the three barrels. When most people look at the gun, they see the jammed BB and fish it out with an allen wrench. The gun or may not load properly after this, but the damaged upper nozzle makes a very poor seal with the top barrel. At this point, your gun may fire one of three ways:
1-- All three BB`s come out of the gun, but the top BB has very little (15~30 feet) velocity/range,
2-- All three BB`s come out, but the top has the least range (15~30 feet) with the lower two BB`s having medium (50~70 feet) range, or,
3-- Only the lower two (or occasionally all three) BB`s are fired, and they have very little (15~30 feet) range.
In situation 1, the top nozzle has been damaged and needs to be repaired or replaced. In all likelyhood, fixing the nozzle will restore the gun to normal firing range. In situation 2, the upper nozzle is damaged, but the lower two barrels may have torn hop-up chambers, accounting for the drop in range. The hop-up chambers will have to be replaced, and only Tokyo Marui, as far as I know, has the only supply of these hop-up units; they are almost identical to the ones used in their spring-powered High Grade Hop-up handgun line. Finally, in situation 3, the BB is still jammed in between the nozzles, and the tri-piston isn`t seating properly. As with the first situation, you might get off lucky with dislodging the BB and repairing the damaged nozzle.
Now to delve into repairs... fixing the broken nozzle isn`t easy, but it is much better to try to repair the broken tip than take the whole gun apart to replace the whole unit. Use a hacksaw or Dremel, and cut the broken part off, making the cut like a step rather than just straight down (see above for the pics, #2 & #3). This way, when mended, it`ll help keep the new piece from jiggling side-to-side. The replacemnt piece can be anything of similar size, and I have used both plastic and brass tips for the job. I don`t know where`d you go about finding these pieces as I just pull them from my huge box of airsoft parts, but I`m sure any hobby shop would carry brass tubing of a similar size.
ADDENDUM (yes, another one...):
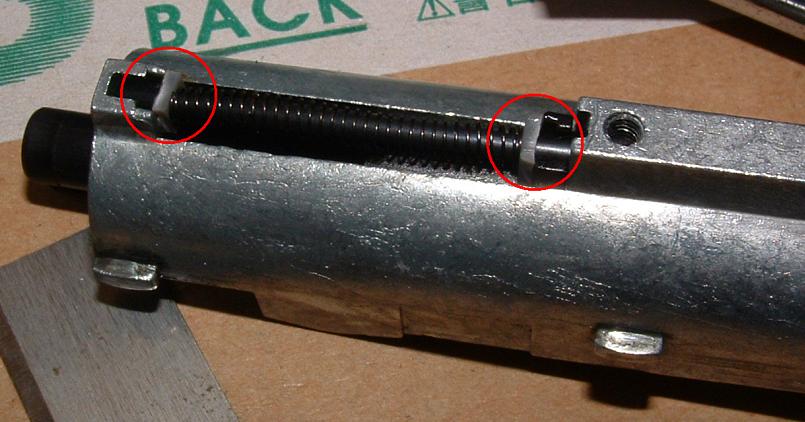
Some of you may notice that your Benelli is firing only two BB`s at full-speed, but there is no jamming and the nozzles are intact. This is usually due to a problem with the BB advance mechanism (okay, that ain`t what it`s called, but find a better name & e-mail me). If you turn your Benelli upside down, you`ll notice a slot that is just in front of the shell door; pump the shotgun, and you`ll notice something moving in there. That something is an L-shaped piece of plastic with two molded-on pins on each side (see above pics #5 & #6). The thinner ones (pivot pins) allow this part to pivot, while the thicker, longer ones (channel pins) extend through the housing and come into contact with the two transfer bars that actually move the piston back when the gun is cocked. Those of you familiar with taking apart the Benelli may remember these protruding pins as the same ones that have to be moved donward in their crecent-shaped port to allow the transfer bars to properly seat. Channels cut in the transfer bars act on the channel pins to cause the BB carrier to pivot downwards during the first half of the pumping cycle; this allows the three BB`s to go through the feed pipe. When the pump is returned forward, the motion is reversed, and the extension on the BB carrier pushes the same three BB`s up & into each barrel. When the gun is only firing two BB`s at a time, it is because one of the pivot pins has sheared off. To remedy this, remove the part from the gun (NOTE: It is not necessary to take apart the whole receiver; you can unscrew the first couple of screws and pry the housing far enough apart to get the BB carrier out), and make a note of the length & width of the remaining pin. Cut it off. Mazel Tov! Okay, now drill a hole where it used to be; you`re going to thread a screw of similar size all the way through so that there`s enough of the screw left on each side to take the place of the former plastic ones. Okay, yet another addendum... Brandon has a problem with his Benelli: she fires when you muzzle-load the BB's, but they don't feed into the barrels on their own. It turns out that a tab on the tri-cylinder cracked, so the unit doesn't move back when the gun is cocked... see above pic #4 for detail of the damage. I cleaned the area up and secured it with superglue... I know, I know, that stuff usually isn't the best, but the part is far to thin to fix with anything else, like roll pins or braces. So far it works, survived quite a few salvos. I'll let you know if it breaks... |
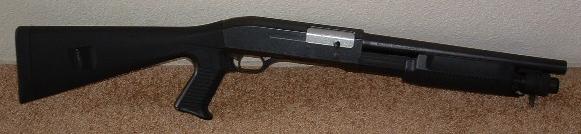 How to... stay alive with your Benelli v.s. their AEG`s!
First off, I suggest an Entry-model Benelli. The full-stock makes aiming faster, and the shorter barrel means dragging less of the surrounding foliage with you. You`ll also need about six shells, four loaded with .25`s, and two with .20`s. The .25`s will take care of the long-range targets, while the .20`s will move faster for those close-encounters of the AEG kind. When you get on the field, partner up with another shotgun or an AEG with a decent rate of fire (no PSG-1`s!) and ammo (forget the MP5`ers with one hi-cap...). If you do go with another shotgunner, at least it`ll confuse your enemy. If you go with the AEG gunner, you can take turns saving each others` ass. Try to stay in the thicker foliage; it`ll give you better cover from AEG fire. When you do find a target, make sure he`s alone-- engaging two M4`s is just plain asking for it! Back on topic, go for guys who are alone or too far from assistance. That will make life easier for you. Wait until they`re within seventy feet before you shoot, and cycle your gun as soon as you do; that way, they`ll have less noise to track you with. If you get pinned down behind a tree or rock, most AEG`ers will get careless as stay relatively unprotected, thinking that you`re as good as gone anyways. Use that to your advantage. Aim at them from behind your barricade, then lean out and fire. The shots will land close to him, if not take him out altogther. Once your last salvo is chambered, go ahead and drop the empty shell and load a fresh one in. Keep the gun on your target since he might try to rush you, thinking you`ve run empty and are vulnerable. If he does indeed come out, nail him.
When all else fails...
...go for elbows and kneecaps that are sticking out from cover; I`ve gotten hits on guns and boots, and that counts just as much as a hit anywhere else. Aim for anything that you see, the tri-shot salvo stands a good chance of hitting something and may surprise you. Remember, your Benelli is like that damned AWP from Counter Strike: one hit is enough to take someone out of the game until the next round.
ADDENDUM: This addition will cover the use of hi-caps, various scopes, shell holders, shorter-than-normal Benelli`s, and Benelli`s with the multi-salvo feature.
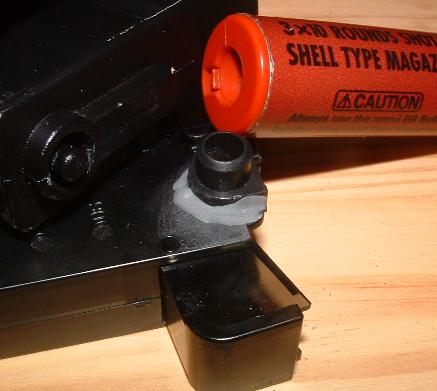
Hi-caps: A Hi-cap for the Benelli is essentially any AEG hi-cap that has been affixed to a shotgun shell so that it may feed the contents (600 BB`s, if you`re using the AK mag!) through the deactivated shell and into the gun. The advantages are obvious: An AK hi-cap will give you about 200 shots of three BB`s instead of the usual ten that the standard 30-round shell carries. The trade off is that the gun may be more of a pain to carry in the field (M16 190-round mags remedy this), the shell door has to be removed, and the larger hi-caps will put more of a strain on your gun as the shell retention system in the Benelli isn`t designed to take a heavy, wobbling magazine. My opinion? Don`t bother. Seven shells is usually more than enough for your standard round of airsoft, and the BB`s rattling around in the mag defeats the purpose of suprise attacks. The only exception would be when a shorter-than-normal Benelli (covered later on) is used as a secondary weapon, and the user would rather use an M16 190-round hi-cap instead of carrying four to seven shells.
Scopes: For the most part, scopes have no place on this gun as the stock sights are more than adequate. The tri-shot pattern does aid your chances of a hit once the BB`s start to spread at 50 feet, unlike a comparable Marui G3 or M16 springer, where that one shot is crucial due to the slower reloading time. Most engagements with the Benelli will take place at under 80 feet; friend/foe identification should be no problem at that range (esp. if he`s shooting at you), and sighting through a scope will reduce your reaction time. Red-dot scopes are becoming increasingly popular in airsoft, but the close range at which engagements occur with the Benelli does open you up to the risk of shattering your lens if someone with an AEG ends up sh!tting BB`s on you. Even stock-power AEG`s can break the relatively thin lens of any scope or red-dot without a kill-flash unit in place. The only exception would be in low-light conditions, and even then, a better alternative would be to use day-glow paint to help illuminate the iron sights. Red-dot scopes at night may over-illuminate your target, rendering it nearly impossible to see.
Shell holders: The shell holder is a critical piece of equipment. If you come under fire and need to reload fast, digging through a pocket full of loaded and empty shells will likely get you shot. Stock- and receiver-mounted shell holders are the best in my opinion, since pouches require your hands to be too far from your gun and bandoliers move around too much. Figure out a system, i.e., putting your empty shells in the first slot, so you don`t waste time in checking to see if the shell you grabbed is loaded or not, or store the shells upside down so you can simply push out a fresh shell with the empty one. Those of you with full-length Benelli`s are advised not to store your shells in the magazine tube; it takes too damn long to get to them.
Shorter-than-normal Benelli`s: This is something new; the shortest Benelli comercially available so far is from Tokyo Marui. It features a 14-n. barrel and a pistol grip. I made an even shorter one, with the inner barrels about 1/2 the length of the standard ones. The only thing to remember here is that this variant, while gaining some velocity from less barrel, will lose somewhat in the accuracy and grouping department, or at least if you consider a large group to be a disadvantage. I developed this shorter M3 (Benelli Mad Shorty) in response for those wanting a more potent secondary weapon or for those who find the 14-in. Entry model to be too large for CQB. In either case, it may be more suitable to utilize a short AEG hi-cap (M16 190-rounder) in place of the standard shotshells, which some find time consuming to reload with. Other than that, have fun!
Multi-salvo capable Benelli`s: Those of you wanting more than the standard three-BB salvo may have disabled the shot limiter in your Benelli. While you do run the risk of ruining your hop-up by loading a second or even third salvo, the prospect of shooting of 6~9 BB`s is too tempting for some. For those of you, a few things to remember:
1- You will run out of ammo sooner.
2- You will lose a lot of range, so aim high.
3- You will have to aim high anyways since the second salvo will push the first out of place and down the barrel; don`t double-cock until ready to fire.
4- You should stick to a light-weight ammo to retain some range, i.e., 12`s or .15`s.
With all that in consideration, maybe the hi-cap isn`t such a bad idea after all... |
 Make a magazine unloader for your Marui loader!
The Marui BB loader is something I have been awaiting for a while now; I was somewhat disappointed back when Marui released a similar product for use with their gas NBB revolver line as it just didn't have the capacity. This current one, which also loads four BB's at a time, is a vast improvement as it holds a little over 100 rounds in a nice compact unit that looks like your typical 9mm magazine. You depress a button which releases a spring-loaded rod that you actuate with your thumb-- kinda like how you would when you're clicking away like a madman at a defective mechanical pencil. The loading port also shows that some thought was put into its design: when open, it doubles the initial pour area size while walls on the sides keep the BB's going in the loader and off of the ground. I have only one complaint: Marui should have incorporated a BB unloader with this item. Let's say that you want to empty your magazine fast-- perhaps you want to transfer the ammo from your SMG to your field rifle for a counter-sniper game, or maybe you're low on ammo mid-game and a team mate tosses you a spare mag-- okay, so how do you go about unloading the magazine without losing any BB's? I've tried using my fingernails and cupping my hands, and if you can get that technique down without losing too much ammo, there's still the issue of transferring it to your magazine. Hell, some of the older AEG magazines don't have that tab that allows you to empty the magazine by hand! So, I came up with a solution-- and like all good solutions, it's cheap, anyone can do it, and it'll take very little time out of your miserable life. All you need are six items: A Marui BB loader, super glue, high-strength two-part epoxy, a drill with a 1/4" bit, sandpaper, and any type of magazine interface that will allow BB's to pass through (I chose the black plastic part that the magazine and nozzle hook up with on the Marui M4-A1 lower receiver). All you have to do is cut the interface to where it would fit on the side of the loader, drill a hole where you'd like the BB's to go in (near the top is great; the BBs have space to go down and the loading port walls, when closed, keep BB's from spilling out), sand the area, then affix the part in position with the super glue while you add the epoxy for the final, high-strength bond. As you can see inthe above pic, it doesn't add much to the loader in terms of bulk, and the interface is short enough to be a solid mount while long enough to unload most any AEG and shotgun shell magazine currently made. Now you can keep those Marui shotgun shells on your Chickenhawk tactical vest for a real reason! |
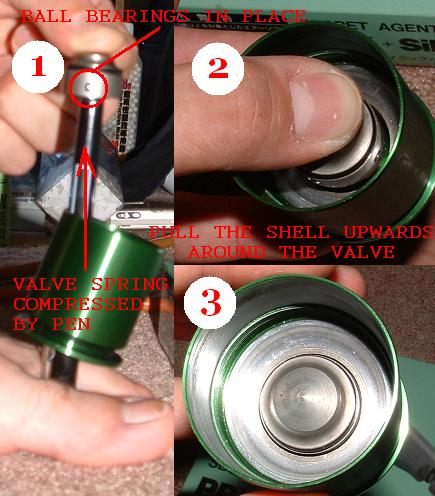 Put those damned ball bearings back in your MOSCART valve... the easy way!
Anyone who has ever taken apart their MOSCART shell knows that it's a pain in the ass to put the valve system back into the lower half; the eight ball bearings (two in each hole) are arranged such that any tilting will surely dump at least one set from one port or another. On top of that, the spring-loaded valve will push those ball bearings out when seated in place, so it seems almost impossible to get the valve back in its cradle. Before, people would smother grease on the ball bearings to "stick" them in place, but there's a much easier way... and all you need is a wooden dowl or pen with a flat end to it. Here's how it's done: in the first frame, shown above, the lower half of the shell is placed over the pen through the hole in the end. The flat end of the pen is used to compress the valve unit spring so that it stays in place instead of pushing the ball bearings out. Now to frame #2: with the unit compressed, pull the lower part of the shell upwards-- since the ball bearings are not trying to fly out from all four directions, the valve unit should seat in place perfectly, which we see in frame #3. That should do it! Screw the end back on, fill & reload, and unleash havoc on your opponents. |
 Modify your Maruzen GBB MP5 K for "Green Gas" use (sorta)!
Okay, maybe I don't trust this so-called modification; I highly doubt that this is supposed to allow your Maruzen GBB MP5 K to use Green Gas safely, but the idea is that it prevents the guide rod spring from punching through the housing. If your K has that problem where it'll jam after each shot, this may be a solution. The pic above shows what needs to be done: remove the bolt unit from your gun, unscrew the two retaining screws on the top of the cover (don't worry, they're the only two screws there so you can't miss them), and set the cover aside. The piston has a spring & guide rod for the nozzle, and the spring is held in by two prongs at each end. For whatever reason, maybe due to the higher pressure of Green Gas, the spring is forced through the two prongs. You can reseat it, but the spring may still do the same thing is the future. What you have to do is slip a washer on at each end to prevent this. Some people say that you can use a #4 split washer, but I just got a scrap piece of plastic that already had a hole in it and slipped it on. The thing to remember here is that the spring shouldn't be able to punch through whatever you use, and that it should be small enough or squared-off such that it will fit back in the housing. Don't worry about glueing it in place, the housing will keep it in once reassembled. So, does this mod make Green Gas a safe option to use in your gun? I dunno, the jury is still out for me on that one. I do like the results, though: I added a one-second burst of Green Gas to a half-full mag of 134a, and the .25's were doing about 260~265 fps. The gun has a much more noticable kick & report, but I wasn't about to chance a full fill of Green Gas. The adjustable hop-up that I installed is letting me put .25's straight for about 100 feet on 134a, and I'm happy with that. |
|
|
|
|


